LBaP! Lesson 5 Overview
Lesson 5: Player Animation States and the Platformer Scene
We have finally reached the point at which we have a platformer scene!
But before we start, I'm happy to announce the Let's Build a Platformer! Lesson 1 Beginners Tutorial PDF is now available in Portuguese! Thank you to Priamo J. for translating the lesson and making the course more accessible to a wider audience.
In this lesson, I have created a platformer type scene designed to give the player a chance to get used to the physics without any danger. The player can also interact with some elements such as sign posts and an NPC.
The following concepts are explored in the lesson:
- Setting up a platformer character's animation states
- The scanline sprite limit (see Lesson Introduction below)
- Applying collision to a platformer scene
- The platformer engine settings
- Dialogue avatars
- Dialogue presets
- Tracking NPC dialogue using variables
- Switches
- Emote bubbles
---
Directions
Read through this overview. Importantly, I am using these devlog lesson overviews to now cover important information that isn't suited to comments inside the project. See below for a detailed lesson introduction where we discuss setting up a player characters animation states, the Game Boy's scanline limitations
Explore:
- the player.png animation states
- The 'On Init' script of the 'Tutorial' scene
- The 'On Init' scripts of the actors in the 'Tutorial' scene
- The triggers throughout the 'Tutorial' scene
Play around with applying different collision tiles in the scene and run a build to see what they all do for yourself. You could add some ladder collisions where the trees are, for example.
Below is a list of assets added to the project and some that have been edited. Have a look through the projects folder directory and explore these assets. For the sprites, make sure to go over their animation states.
---
New Platformer Tileset!
Included in this lesson is my own take on the GB Studio Sample Projects Platformer tileset. You are free to use this in your own non-commercial projects.

---
New Emote Bubbles!
Included in this lesson are a series of edits to the emote bubbles I have made for the project. Again, these can be used in non-commercial projects. Remember, all assets in this project are free for personal use, including Pea and Gardener Greg's sprite sheets!
You can save the image below or download the project to find all these emotes in the /assets/emotes directory as single PNG files.

---
Additional Features to the 'UI Elements+' Plugin!
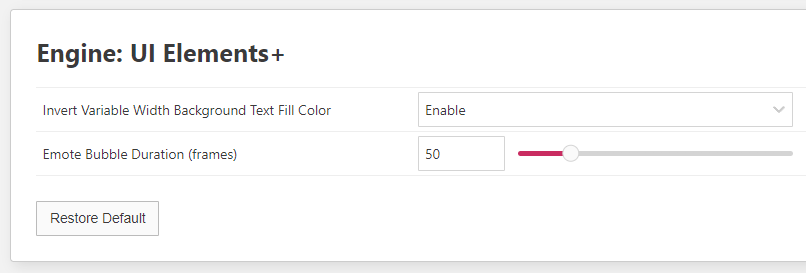
I have added the option to change the amount of time the emote bubble stays on screen for (in frames) in the engine settings or by updating the engine using the 'Update Engine Field' event in a script.
Mike Leisz (gud_graphics) and I have been collaborating to expand the functionality of the avatar feature. Thanks to Mike's generous support, we now have a new event included in the 'UI Elements+' plugin!
The 'Display Dialogue (Avatar+)' event allows you to switch the position of the avatar to the left-hand or right-hand side of the dialogue box. You can also further tweak the location of the avatar by offsetting its position (in tiles). We are looking into further expanding on this to include support for 24x24px and 32x32px avatars.
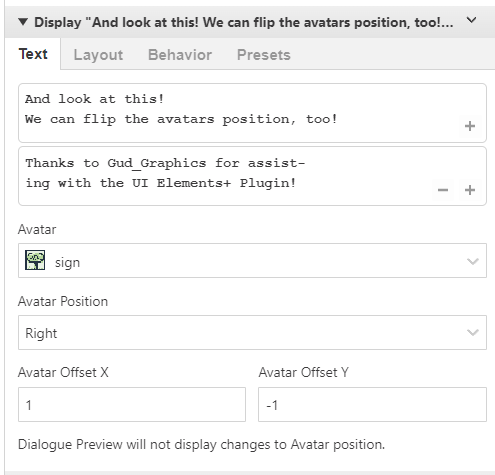
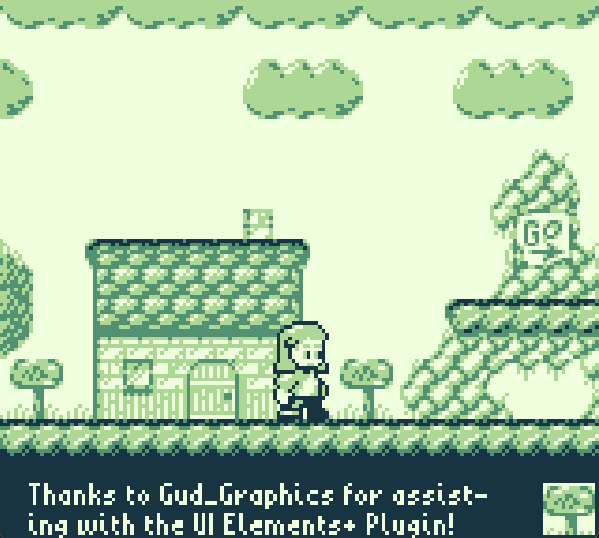
The LBaP! UI Elements+ Plugin is now being hosted on Mike Leisz's Gud GBS Plugins repo. You can download the updated 'UI Elements+' plugin there to use in your own projects.
---
Additional Assets
The following files have been added to the asset directory:
/assets/backgrounds/levels
- tutorial(no_slopes).png
/assets/sprites/level_one
- dpad_up.png
- player.png
/assets/avatars
- gardener_greg.png
- pea.png
- sign.png
The following files have been edited in the asset directory:
/assets/emotes
- anger.png (free emote variant)
- love.png (free emote variant)
- music.png (free emote variant)
- pause.png (free emote variant)
- question.png (free emote variant)
- shock.png (free emote variant)
- sleep.png (free emote variant)
- sweat.png (free emote variant)
---
Additional Custom Scripts
The following custom scripts have been added to the project:
- SFX/Dialogue/Gardener Greg
- SFX/Dialogue/Emote/?
- SFX/Dialogue/Emote/...
- SFX/Dialogue/Emote/Sweat
---
Lesson Introduction
Setting up a Player Characters animation states is one of the most important periods of a games development when making a Game Boy game specifically.
If the Player Characters unique sprites aren't optimized, the game can suffer in the long run because scene sprite limits will be reached sooner. This can affect how many unique enemies or collectibles you can put in a scene, how detailed each enemies animations can be or how far you can push the "game juice" by including projectile based particle effects, for instance.
The Basic Player Character Animation States
Below, I have edited the sample projects player_platform.png to create player character with a smoother running animation using a total of 19 unique sprite tiles (the sample projects player_platform.png uses 17 unique sprite tiles).
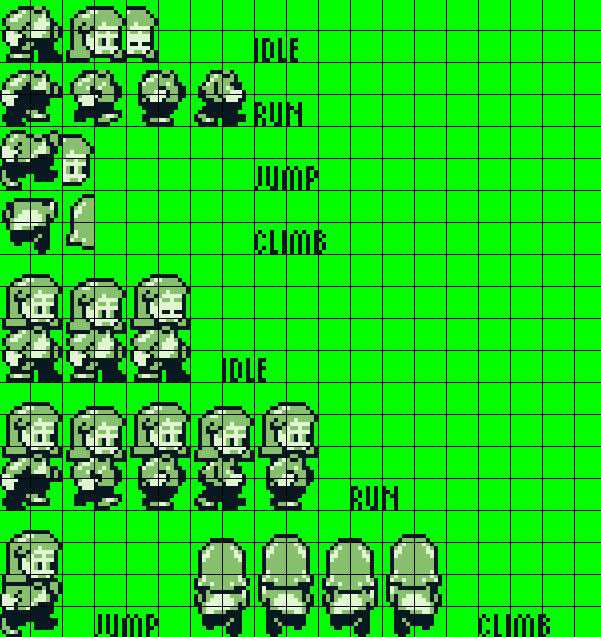
The top half of the image features the sprite tiles that make up Pea's various animations while the bottom half presents all the frames that make up animation states using those sprite tiles. By overlaying Pea's head sprite tiles over the top of her body and flipping the sprites such as the 'Climb' animation, we can drastically reduce the total amount of unique sprites.
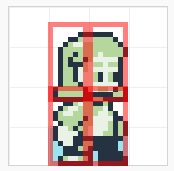
Above you can see one of the idle animation frames with the two "head" sprites placed over the two "body" sprites to create a single metasprite. We have reduced the total amount of unique tiles using this method, yes, but we have also increased the risk of exceeding the "scanline limit" of the Game Boy because we now have overlaid sprites.
The Scanline Limit
To understand why this could potentially be an issue, we must understand whats going on with the Game Boys scanline limit. A scanline refers to a horizontal row of pixels. The Game Boy's resolution is 160px wide x 144px high. It therefore has 144 scanlines.
A very significant limitation of the Game Boy is that it can only render up to 40 sprites on screen at any one time and only 10 sprites along any one scanline.
In the idle animation frame above, there are 4 sprite tiles that will be rendered over 3 scanlines right where Pea's chin is in order to display this frame of animation. Therefore, only 6 more sprites can be rendered along a scanline where those 3 pixels of overlapping sprites are during that frame of animation. If the scanline limit is exceeded, the sprites will simply not render and an actor will become partially or fully invisible as a result.
You may have come across "sprite flickering" when playing Game Boy games in the past, where the sprites start to flicker on and off when lots of sprites are on screen at any one time. This is a control measure coded in to games to try and design around the scanline limitation. Currently, GBS users can only do their best to manage the scanline limitation by carefully designing metasprites when creating animation states.
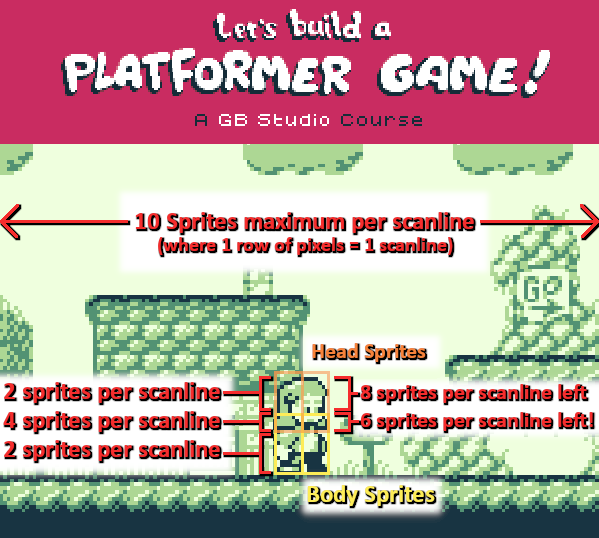
Depending on the game we are making, it may be more beneficial to avoid overlapping sprites so we can prioritize maximizing the amount actors that can be displayed per scanline. For example, if we were designing a shmup and we wanted to have lots of enemies flying around on screen in close groups, then making sure all enemy actors are only two sprites wide at all times so we can fit up to 5 enemies per scanline might be best.
The Platformer Engine Settings
To finish off this lesson introduction, let's take a look at the values I have assigned to the Platformer Engine parameters.
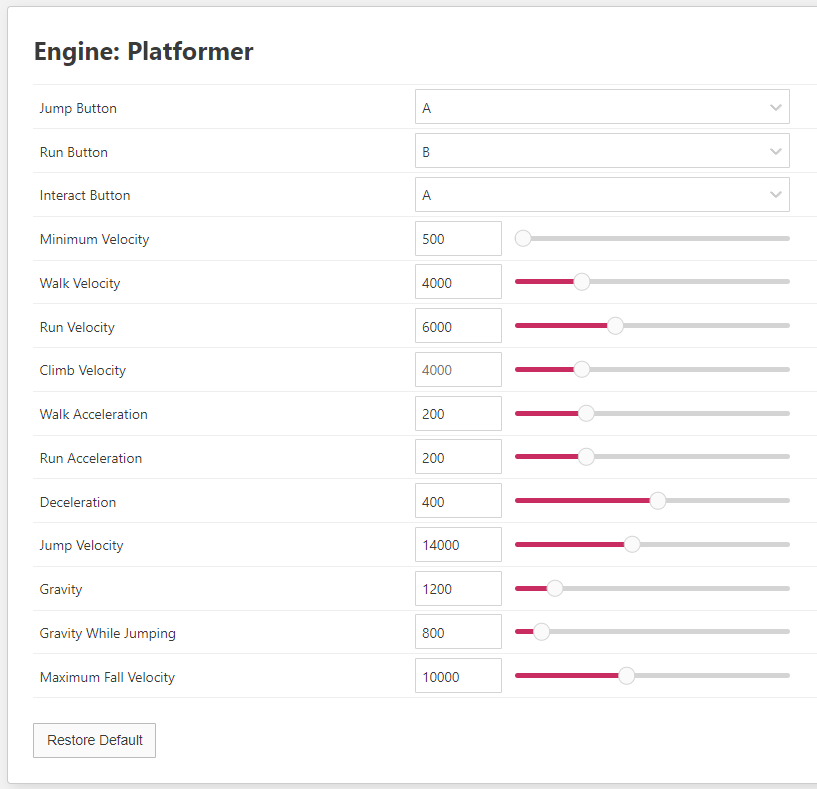
Its all self explanatory I hope, but if you have specific questions about any of the above parameters, let me know in this devlogs comment section. I've also shared this image so that you can change these values in the project file and see what happens when they are edited. You can always come back here and reset them when you are done.
When settling on these values, its obviously important to pin down a sense of gravity and inertia that feels nice to you. Its also important to think about and record the finer details of the players movement so that you can begin to formulate rules when it comes to level design. The following are some examples of questions you should seek to answer when designing the physics of your platformer game:
- How high should the player be able to jump?
- How long should the players jump arc be when they are walking?
- How long should the players jump arc be when they are running?
- Should the player run at all?
For example, I have determined that I want the player to jump to a maximum height of around 3.5 tiles high. Relative to the Player Character's (Pea's) height, that's about as tall as Pea herself.
When I get to designing level layouts, I know that Pea can jump to platforms that are 3 tiles high with enough room to reach the apex of her maximum jump height (when the player presses and holds the jump button) and go into a falling state for a moment before landing on the platform from above.
I also know that because the default platformer engine is very lenient when allowing the player to land on a one-way platform from below, Pea will snap to one-way platforms that are 4 tiles high. In fact, the platformer engine is so lenient in this regard, that it looks like the player is teleporting to the platform over several pixels sometimes. In my opinion, this doesn't feel very nice (or look very nice for that matter), so we will look into reducing this snap to one-way platform threshold in the next lesson by the way. In any case, you can see just how detailed you can get when breaking down the movement by asking several questions as you test your physics parameters.
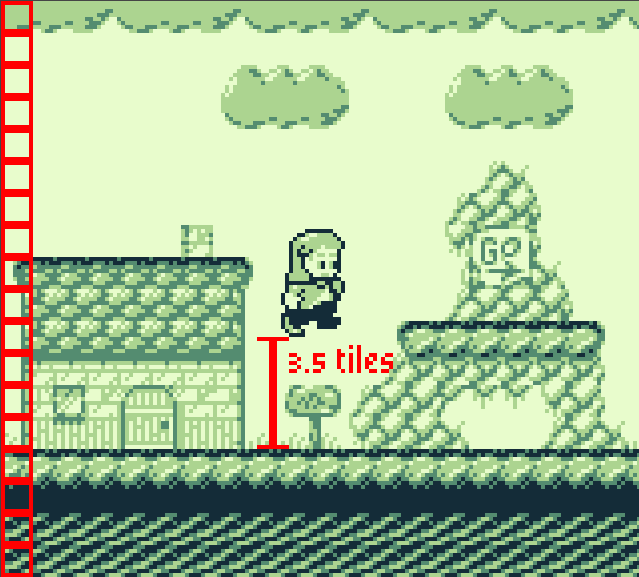
If I am being honest, the vanilla platformer engine is, to put it kindly - lacking in flexibility. While I have offered only four example questions regarding the player movement above, we should be asking dozens of questions.
In the next lesson, we will dive deep into Hauntology's Platformer+ Plugin, the single most important plugin we will be using in this course. We will use it to greatly expand on both the player animations and the player move-set. We will also add some timber log collectibles to the 'Tutorial' scene, completing the games introductory mission so Gardener Greg can build a new staircase and Pea can continue her adventure.
Until next time, happy coding!
- Tom (Gumpy Function)
Files
Get Let's Build a Platformer!
Let's Build a Platformer!
A comprehensive course for GB Studio 4+
| Status | Released |
| Author | Gumpy Function |
| Genre | Educational, Platformer |
| Tags | 2D, Game Boy, Game Boy ROM, gbstudio, sourcecode, Tutorial |
More posts
- Playtiles Game Development Kit Announcement!Aug 19, 2025
- LBaP! v1.1 Update (Free Version)Jul 16, 2025
- LBaP! v1.1 UpdateJul 15, 2025
- LBaP! Full Course Out Now!Jun 21, 2025
- LBaP! Lesson 12 UpdateMay 22, 2025
- LBaP! Lesson 11 UpdateApr 30, 2025
- LBaP! Lesson 10 UpdateApr 08, 2025
- LBaP! Lesson 9 UpdateMar 07, 2025
- LBaP! Lesson 7 & 8 UpdateFeb 17, 2025
- LBaP! An Important UpdateJan 30, 2025

Comments
Log in with itch.io to leave a comment.
In case anyone wondering why there are three scanlines mentioned where the sprites overlap: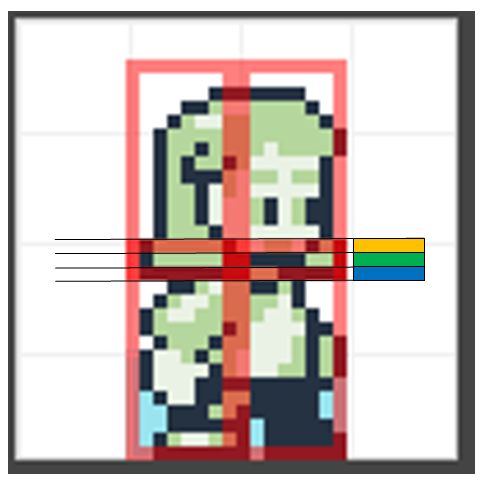
The red border that is shown is included in the sprites size.
So each sprite has 8x16 pixels, including the red border.
The yellow box marks the end of the lower sprites and the blue the end of the upper sprites.